Why Use Tile Leveling Spacers for Perfect Results?
A flat tile surface can look effortless, but the installation process rarely is. Slight height differences become obvious under side lighting, especially across large-format porcelain tiles. Tile Leveling Spacers help control these differences while adhesive cures, keeping neighboring edges aligned and grout joints consistent. They do not replace proper substrate preparation, coverage, or skilled adjustment.
Industry standards explain why this support matters. The Tile Council of North America’s TCNA Handbook emphasizes stable substrates, correct mortar selection, and movement accommodation for durable tile installations. ANSI A108.02 also recognizes allowable lippage limits, including tile warpage and grout-joint width. In practical terms, a small error can remain visible when the surface is inspected closely. It can also catch a bare foot.
Professional installation research supports careful planning. The National Tile Contractors Association’s training materials repeatedly stress mortar coverage, layout control, and substrate flatness. Meanwhile, ceramic tile market analyses from Tile Council of North America and Grand View Research show strong demand for porcelain and large-format surfaces. These products can create cleaner visual lines, but their size makes uneven edges harder to hide.
The result depends on more than the clips.
Tile Leveling Spacers can reduce tile-to-tile height variation and help maintain a deliberate layout. Installers still need to check the floor, comb mortar consistently, and remove spacers correctly. The system is useful, not magical. Sometimes, a spacer prevents a problem; sometimes, it only exposes poor preparation. That uncomfortable detail deserves attention. Perfect results begin with realistic tolerances, reliable tools, and repeated checks before the adhesive sets.
What Are Tile Leveling Spacers and How Do They Work?
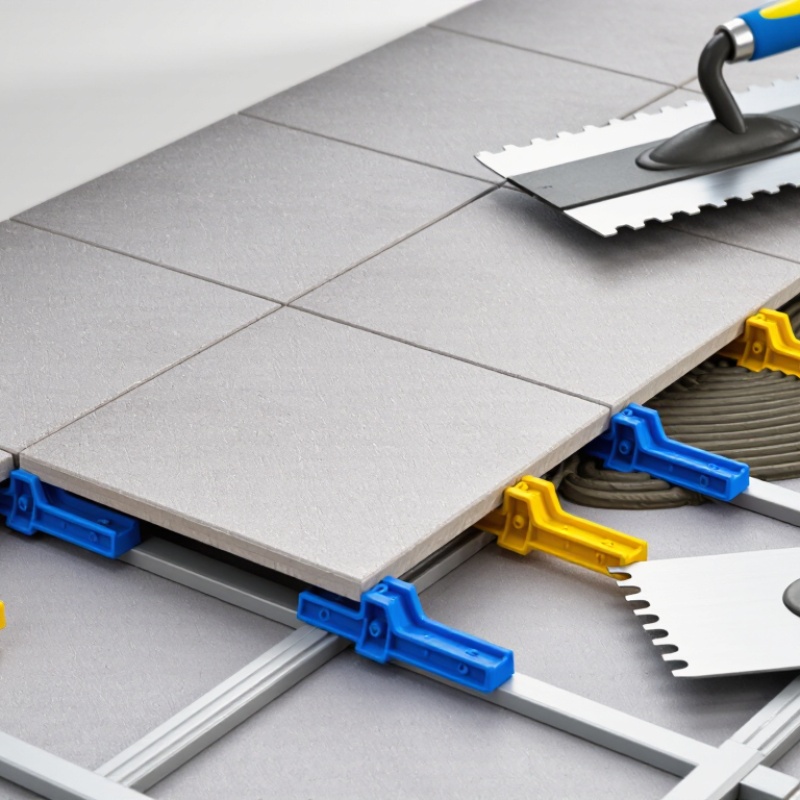
Tile leveling spacers are small installation aids that help keep neighboring tiles aligned while adhesive cures. Most systems use two parts: a clip placed beneath tile edges and a wedge or screw that applies controlled pressure. This pressure reduces lippage, where one tile edge sits higher than another. It also helps maintain consistent grout joints.
The process starts with a properly prepared surface. Dust, uneven patches, or weak adhesive coverage can undermine the result. After spreading adhesive, I place clips along the tile edges, usually near corners and longer sides. The next tile slides into position, and the wedge tightens until both surfaces feel even. Do not overtighten. Excessive pressure can squeeze out adhesive or shift the tiles.
These spacers are especially useful with large-format porcelain tiles, where small height differences become noticeable under bright lighting. They improve alignment, but they cannot correct a badly uneven floor. That limitation matters. I once relied too heavily on spacers and ignored a shallow dip in the substrate; the finished row still looked uneven from across the room. Careful surface preparation would have prevented it. After the adhesive sets, remove the clips by tapping them sideways, not upward, to avoid disturbing the tile. Always check the recommended joint width and curing time for the adhesive being used.
Key Benefits of Using Tile Leveling Spacers
Why Use Tile Leveling Spacers for Perfect Results?
Tile leveling spacers support flatter surfaces by reducing height differences between neighboring tiles. They are especially useful with large-format porcelain, where slight floor movement becomes highly visible. ANSI A108.02 allows limited lippage, often about 1/32 inch for narrow grout joints. Spacers help installers work closer to that standard.
The benefits are practical. A leveling system holds tile edges while adhesive cures. This can reduce rocking, uneven grout lines, and visible shadows across polished surfaces. It also improves workflow on walls, floors, and shower areas. The 2024 U.S. Houzz & Home Study reports a median bathroom renovation spend of $13,500. Protecting that investment requires more than attractive tile selection.
Small details matter.
From hands-on installation, spacers work best when the substrate is already flat. They cannot correct major dips, weak adhesive coverage, or rushed preparation. That limitation is easy to overlook. Installers should check the surface with a straightedge, follow the adhesive’s open time, and remove clips carefully after curing. The National Tile Contractors Association emphasizes substrate preparation and coverage as core installation controls. A leveling spacer is helpful, not magical. Used with suitable joint widths and consistent pressure, it can create cleaner transitions and reduce avoidable rework.
Why Use Tile Leveling Spacers for Perfect Results? - Key Benefits of Using Tile Leveling Spacers
| Evaluation Dimension | How Tile Leveling Spacers Help | Practical Result | Important Consideration |
| Surface Flatness | Clips and wedges apply controlled pressure to help keep neighboring tile edges at a similar height while the adhesive sets. | A flatter finished surface with fewer raised tile edges, commonly called lippage. | They support alignment but cannot correct an uneven substrate or excessive adhesive variation. |
| Joint Consistency | Spacers help maintain a consistent gap between adjacent tiles during installation. | More uniform grout lines and a cleaner overall pattern. | The required joint width depends on tile size, edge type, layout, and project specifications. |
| Installation Efficiency | The system provides a repeatable method for aligning tiles instead of relying only on visual adjustments. | Less time may be spent correcting tile height differences during placement. | Correct installation technique is still required, especially around corners, walls, and transitions. |
| Visual Quality | By limiting movement while the mortar or adhesive cures, the system helps preserve the planned tile layout. | Straighter rows, more even intersections, and a more professional appearance. | Lighting and tile color can make minor alignment differences more noticeable. |
| Tile Format Suitability | Leveling systems are particularly useful for large-format tiles, which can be more difficult to keep flush by hand. | Improved control when working with broad tile faces and long edges. | Select a system that matches the tile thickness and follow the recommended spacing between clips. |
| Movement During Curing | The components help reduce unwanted shifting caused by foot traffic, vibration, or minor tile movement before the adhesive cures. | A more stable layout during the curing period. | Tiles should not be walked on or heavily loaded before the adhesive manufacturer’s stated curing time. |
| Grouting Preparation | Consistent tile spacing creates a more predictable joint for grout application. | More even grout coverage and fewer visually irregular joints. | Remove the leveling components as directed before grouting; do not leave clips in the joint. |
| Work Quality Control | The system gives installers a visible reference for tile height and spacing throughout the layout. | Easier identification of alignment issues before the adhesive hardens. | Use a straightedge, check the substrate, and inspect the layout regularly for the best results. |
Note: Tile leveling spacers improve alignment and joint consistency, but they do not replace proper substrate preparation, suitable adhesive coverage, correct tile spacing, or compliance with installation instructions.
How to Choose the Right Tile Leveling Spacer System
Why Use Tile Leveling Spacers for Perfect Results?
How to Choose the Right Tile Leveling Spacer System
A suitable leveling system helps keep tile surfaces even while adhesive cures. It can reduce lippage, especially across large-format tiles. However, spacers cannot correct a badly prepared floor. The substrate still needs checking. Start with three tiles.
Choose the system according to tile thickness, joint width, and installation area. For thick porcelain, use clips with enough height and firm pressure. Narrow joints need compatible clips, or plastic may crowd the edges. Check the size range before buying. Measure twice. A small sample installation reveals more than packaging claims.
Reusable wedges can control pressure consistently and reduce waste. Screw-style caps may feel easier for beginners, but they can slow large projects. For walls, choose parts that hold tiles without sliding. For floors, consider grip, breakaway direction, and cleanup time. Keep adhesive coverage even beneath each tile. Remove squeezed adhesive before it hardens. I once trusted a “universal” system and found the clips too tight. That mistake taught me to measure actual tile variation, not only stated thickness. Careful preparation matters more than clever accessories.
Why Use Tile Leveling Spacers for Perfect Results?
How to Choose the Right Tile Leveling Spacer System
Match the Joint Width
Choose a spacer width that matches the planned grout joint. The values shown are nominal metric widths with exact inch conversions.
Check Tile Thickness
Select clips and wedges designed for the tile thickness range. The leveling system should hold adjacent tile edges at a consistent height.
Prepare the Substrate
Leveling spacers reduce edge height differences, but they cannot correct major substrate unevenness or replace proper mortar coverage.
Joint widths are nominal layout dimensions. Final spacing should follow the tile manufacturer’s instructions, tile-size variation, installation standards, and the required visual design.
Step-by-Step Guide to Installing Tiles With Leveling Spacers
Tile leveling spacers help keep neighboring tiles at a consistent height and reduce uneven edges. They are especially useful on large floors, wide walls, and tiles with slight thickness variations. The result depends on preparation, not the spacers alone.
Start with a clean, firm, and reasonably flat surface. Check it with a straightedge, then repair noticeable dips before spreading adhesive. Dry-fit several tiles to study the layout and avoid narrow cuts near visible edges. Apply adhesive evenly with a notched trowel, holding the tool at a steady angle. Press each tile into place with a gentle sliding motion.
Keep the joints open with the correct spacers. Insert leveling clips along the tile edges, then slide in the wedges by hand. Tighten them until the surfaces align, but stop before forcing the tiles down. Too much pressure can squeeze out adhesive or shift the layout. Check the surface with a level after every few tiles.
Do not rush.
Wipe away adhesive from the joints before it hardens. I usually recheck corners because they often reveal small height differences. Allow the adhesive to cure according to its technical instructions. Remove the clips with a firm sideways tap, never by twisting the finished tile. Inspect the surface under direct light. A slight imperfection may remain, especially on handmade-looking tiles, but careless preparation should not be blamed on the leveling system.